Monday, March 14, 2011

Coconut Cream Pie

Ok, so now that you know how to make pie pastry, you can start to "wow" all your friends, family and coworkers. People seem to be so impressed when you show up with dessert. Truth is, it really is so simple. To me, bringing dessert to someone, is like owning a flower shop, you always put a smile on someones face. Bring me flowers or dessert, and I am one happy girl.
This is a great pie since even though it is creamy, it is not too sweet or to rich. It really is quite lovely, and simple. Hope you enjoy it!

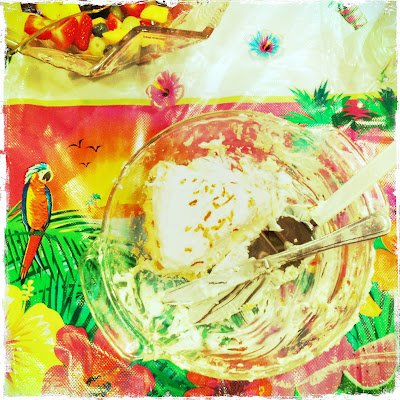
Photo taken by my friend at our Hawaiian themed office potluck

Coconut Cream Pie

Basic pie pastry

Once you have rolled your pastry, fill it either with pie weights or line with aluminum foil and fill with dried beans and bake at 400 F for approx. 20 mins. Carefully remove your weights and bake for about another 10 mins, or until it is a nice golden brown. Allow it to cool completely before you fill it.

Coconut Cream filling

1/2 cup granulated sugar
1/4 cup cornstarch
2-1/4 cups milk, scalded
4 egg yolks, lightly beaten
1 tsp pure vanilla extract
1 cup flaked, sweetened coconut
2 tbsp butter, unsalted
3/4 cup whipping cream


  1. Combine the sugar and the cornstarch in a medium sized saucepan and then slowly add in your scalded milk. Cook over medium heat, stirring constantly with a whisk, to ensure no lumps, until it has a nice thick and smooth consistency. 
  2. Add approx. 1 cup of the hot mixture into the egg yolks and combine. Then add the entire egg mixture into the pot. Be sure to continue whisking and bring it to a boil.
  3. Remove it from the heat, and add in the vanilla, coconut and butter. Cover with plastic wrap and refridgerate for approx. 2 hours.
  4. Whip the cream to stiff peaks and fold it into your chilled filling.  Pour it into your cooled pie shell.


Topping
1 cup whipping cream
1/2 tsp pure vanilla extract
1/4 cup shredded coconut
1/8 cup toasted shredded coconut

  1. Whip the cream into stiff peaks, and add in the vanilla and the coconut. Spoon it onto the cooled pie.
  2. Sprinkle with the toasted coconut
Chill until serving time and ENJOY!
The last piece

Pie Pastry 101

I didn't grow up eating pie. In Hungary, where my family originates from, they don't eat pie. When my family came to Canada, while they picked up many North American traditions, pie was not one of them. So I don't have my grandmother's technique. For years I struggled with pie pastry. After all, what does "pea sized" mean exactly? Sometimes it was 'passable', while other times not so much. Either way, it always 'caused me great anxiety. Until I took a class on making pie pastry with Toronto's only Wanda Beaver, of Wanda's Pie in the Sky. She makes a mean pie and so I was thrilled at the opportunity to learn from the best. And now I too can say "easy as pie" because it is. So, I will share it with you, as best as I can.

First thing though, tools. I have tried, knives, a special pie cutter, a fork, and even my hands. And what works best is this classic pastry tool.

Next, the ingredients for a simple pie crust:

1-1/2 cups all purpose flour
1/3 cup cold unsalted butter, cut into 1/2" pieces
1/3 cup vegetable shortening, also cut into 1/2" pieces
pinch of salt
1/4 cup COLD water

In a medium sized bowl, combine the flour, butter, shortening and salt and mix together. Notice how white the flour is when you start.


You are ready to add the water when it starts to take on a yellowish colour, and is 'pea-sized'.


Sprinkle all of the water on top of the mixture at once, and let it sit for approx. 30 secs.

Using your tool again, begin to mix it all together. When it all starts to gather onto your tool, it is ready. 

Shape it into a disc, wrap it in plastic wrap and chill for approx. 15 mins. before rolling it out.

Friday, March 11, 2011

The simple things in life...

I grew up in a predominantly jewish neighborhood in Toronto. All around me the kids were eating bagels, and soon so was I. As a teenager, I got a job at our neighborhood bakery, The Uppercrust, and my love affair with bagels truly began. There were so many kinds, mini, twister, poppy, sesame, salty, everything and I love them all. For me, when I think of true comfort and my youth, the smell of toasted bagels is a big part of it. Years later, I traveled to Montreal and was introduced to its many bagel shops around the city. Open 24 hours, these wonderful little shops, showed me what we didn't have in Toronto. From what I know, you are a St. Viateur or a Fairmont or a St. Urbain person. Each shop has its own unique way of making the bagel. It is a wonderful thing to see if ever you have the chance.


So, what am I? A die-hard Fairmont girl. I always make a trip there, even if I am just passing through the city. Rain or snow, by the light of the sun or moon, I will get my bagels. And the beautiful smell of them in the bag as I sit on the plane is something that I look forward to bringing into my home. I have passed this love affair on to the rest of my family too, so really, I have no choice but to get them bagels or I would have a riot in my house.


My favorite sandwich, which I only eat on a Fairmont bagel is this:

Toasted bagel
Mayonnaise
Fresh sliced tomatoes
Smoked Applewood cheddar
Fresh Arugula

It has also become a pretty popular sandwich in my house too. Simple but tasty.


Sunday, March 6, 2011

Cheesy Goodness

I love this recipe. It is easy to make and full of flavour and comfort. You can't really go wrong in preparing it or serving it. People always love it, and served which a fresh tomato and parsley salad on the side, you have the perfect combination of rich goodness, and fresh tartness.
I also love this recipe because it is never the same thing twice, in my house anyway. I love to mix up the cheese, and add in whatever I have left in the fridge to use it up. Sure I have my staples, cheddar, gruyere and Parmigiano, but I also find that blue gives a nice little zing to it as well. I have been know to include asiago, brie and goat to name a few, and it never goes wrong. So have a little fun!
Mac & Cheese (serves 6)
4 tbsp butter
2-1/4 cups milk (heated)
1/3 cup all-purpose flour
1/8 tsp ea. salt, pepper, cayenne, nutmeg
2-1/4 cups grated cheddar cheese
1 cup grated Gruyere 
1 tbsp dijon mustard
1/2 cup grated Parmigiano
1/2 lb macaroni
1/4 cup fresh bread crumbs

Preheat oven to 375 F and butter a 1.5 quart casserole dish
Fill a large saucepan with water; bring to a boil. Add macaroni and cook until ready. 
In the meantime, in a small/med. saucepan, over medium heat the milk.
In a separate med/lg saucepan over medium heat, melt your butter. When it begins to bubble, add in your flour, whisking it for a good 1-2 minutes.
While whisking, slowly stir in the hot milk. Continue to cook and whisk until it bubbles and gets nice and thick (for those who don't know, this is a roux - the base for most cream sauces).
Add in you dijon mustard and you cheddar & Gruyere cheese - saving 1 cup for the top. This is where you would add in additional cheese if you were doing so. All except the Parmigiana which is also for the top.
Once the cheese has melted, add in your spices and taste.


Once your macaroni is ready, pour it into the cheese sauce and mix it together. Then pour the entire mixture into your casserole dish. Sprinkle with your bread crumbs, and remaining cheddar, Gruyere and Parmigiano.


Bake in the oven for 30-45 mins, or until nice and brown at the top. Cool for 5 mins before serving. Enjoy!!